Please also note that I will not be held responsible if you manage to brick your PSP
Difficulty: Beginner
Welcome to my tutorial of installing PSP custom firmware 6.60 PRO on your PSP. Please do note that I do not take any responsibility of this tutorial damaging your system. However if you follow step by step you should be good to go. At the end your PSP system information should look something similar to what I have.

Step 1
Download the required files for your PSP (I will link them to you at the very end of this tutorial), so that you know these are the proper files that you will need in order to install for your system. Once you have the files downloaded, extract them and take the appropriate file corresponding your PSP system compatibility. In this case I will take the 6.60 PRO-B9 since I have a compatible PSP 2000 and mother board pre TA-88v3., it should look some thing similar to this., once the downloaded file has been extracted.

Next we are going to drag and drop the files we have downloaded onto our PSP’s memory stick.( Once again these files depend entirely on what model you have, I have the PSP 2000, and I will be copying the 6.60 custom firmware files on to my PSP memory stick. Drag them on to the GAME folder which can be found on the root of your PSP’s memory stick and by root, I mean when you open up your PSP the first dialogue you see will be where you drag your files into. So the Path is like this.
X:/PSP/GAME/Desired custom firmware files, you have downloaded.
X being your PSP drive
PSP being the PSP folder on the root directory
GAME being the folder that you drag and drop the files in.

Now that we have done the copy pasting of files we can now get back on the PSP and exit out of USB mode and get back on the PSP.
Step 4
Now on the PSP go to the game section and you should have almost the same if not exact files that I have on the PSP.
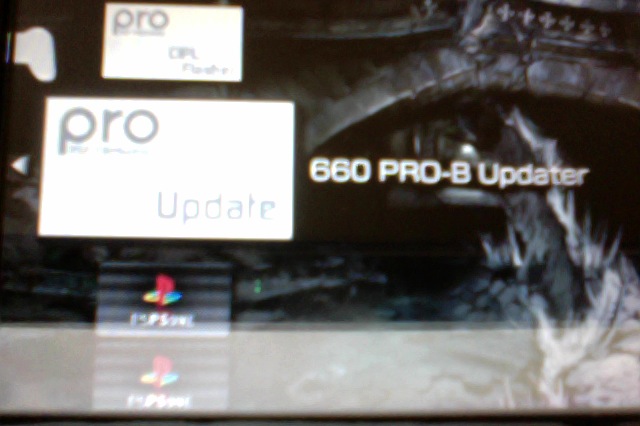
Installing the custom firmware, you will need to launch the PRO updater in order to install the firmware, press the X button on your PSP to enter into the PRO updater file that you just dragged and dropped on to your PSP, it should look something similar to this.

Next we are going to press the X button again to launch the Custom firmware, once again please be reminded that this is only a temporary custom firmware for models past the pre TA88V3, that TA88V3 and above. OK press the X button and wait, and you should be returned to your XMB (home) screen, it would appear that nothing has changed but if you go to your system information and find that it should say PRO-B9 after 6.60, so 6.60 PRO-B9
Congratulations you now have installed custom firmware 6.60 PRO-B9 on to your PSP enjoy your homebrew.
Extra information
For those that have the ability to go permanent then please follow these few extra steps.
You need to copy CIPL flasher from your desktop to your PSP to the same location that you pasted the PRO updater file. Go back to the games section on your PSP and you should see an extra icon saying CIPL flasher press the X button again to install, you should have permanent custom firmware now.
This is only for all the 1000s and 2000s pre TA88V3
EDIT:
For those of you who are on Lite Custom Firmware not Permanent, please use the fast recovery file that is also included with the downloads. This is for models that exceed or are on the TA88V3 mother board and all the GO models and 3000s
Links for files. Updated
Niciun comentariu:
Trimiteți un comentariu